
Speakeasy Corporation: WEST
WEST: (White Star Engagements; Strategies & Tactics)
- White Star Engagement Strategies & Tactics
- Standard_Information
- WEST: Planets & Relics
- Weapon Damage
- WEST: APEX Formula: Assess, Plan, Execute & Exploit
- Essential Intelligence
- WEST Mining Operations
- Special Forces; Modules & Tactics
- Essential Modules & Concepts
- WEST ⁝ Future Initiatives
White Star Engagement Strategies & Tactics
☰ The WEST division (White Star Engagement Strategy & Tactics) is a cross-system, rotational, integrated military and civilian Task Force, wherein each partcipating sub-fleet Captain reports to the designated Fleet Admiral and/or his/her assigns.
The WEST objectives include both Artifact acquisition and the corporate advancement these provide, as well as the performanced-based credit & hydrogen resources rewarded to all participants at the end of each match, with a greater share allocated to sub-fleet commanders of the winning fleet.
We are dedicated not simply to helping the corporation achieve victory, but ensuring it is both decisive, consistent and profitable for each sub-fleet in each and every match.
Standard_Information
![]()
[] Standard Operating Procedures and Protocols; Click to View
WEST: Rules of Engagement
- Utilize assigned Vectors and perform assigned Role(#orders)
- Adhere to Mining Relic Operations Plans
- Optimal use of Modules; See: Tactical Maneuvers
- Learn to master Time Machine & the use of Manual vs. Automated moves
Responsibilities: Captains & Officers
Officer Expectations
- Officers will read and confirm an understanding of the Battle Plan Summary, and carefully review and fully comprehend the detailed Plan corresponding to each of the three (3) phases, with an emphasis on Phase 1 & 2.
- Officers shall advise and consult with the Admiralty regularly throughout the engagement.
- Officers shall provide guidance and assistance to all Captains in the Fleet, and rally them to execute maneuvers and modules in a timely manner, consistent with this Plan, or, ideally in coordination with the Admiral, help the Fleet and ship Captains effectively adapt to unforeseen changes or opportunities.
Senior Member / Captain Expectations
- Carefully Adhere to this Plan and all Orders from the Fleet Admiral, Vice-Admiral, Officer; Each Captain shall then be free to act at their own discretion and using their best judgment, to exploit a sudden opportunity, or respond to the request for assistance from a fellow Captain, in that order of priority. Captains shall first make every attempt to contact their superiors, beginning with the Admiral and Vice-Admirals, before making any such moves.
- Captains shall carefully consult the "Order Board" as often as possible, taking note of the "Last Updated" time stamp, and seeking always to confirm live all such orders, in accordance with the chain of command outlined above (#1).
- ☰ Critical and Above All ☰ Captains shall strive to communicate with other members of the Fleet often; Seek to engage others in discussion, make astute observations and inquisitions; with the objective to: Help to identify Risks & Opportunities;
- Captains shall make best effort to be responsive to Urgent Order Requests or Fleet Alerts (☰ ❖ Fleet Alert ☰). Captains are to remain Alert, Attentive, Able & will to adapt; Captains are advised to strongly consider providing the Admiral with urgent contact information which may be used for Emergency Alerts.
Below you can click to see a complete explanation of the preferred Technologies (will expand to reveal that section) and just below that you will find a summary table that more or less reflects those same preferences. Questions? Just ask!
[] WEST Technology Guidelines
Mining Modules
- Mining Boost: 7+
- Level 7 = 5x, up from 4x @6 (and up from 3.5x @5)
- Level 8 = 6x @ Cost ¢1M
- Remote Mining: Captain's Discretion, 7+ Recommended
- Crunch: 2
- @350H, instantly clears basic WS sector, greatly assisting in the "near home warp" Sector housekeeping that later protects our Transports when returning to HW with Relics on board, robbing the enemy of critical Waypoints that would otherwise aid in their assault on our convoy(s).
- Genesis: 4
- @300H creation, equals to 2 Relics @PX; Beyond Level 4 is of diminishing return.
- Enrich: Captain's Discretion, Level 6 Maximum Recommended
- Mining Unity: 5+
- Depending on your role, Unity can significantly increase your offensive output. For example, just three friendly ships will result in nearly doubling the damage dealt by your primary weapon.
Rocket Modules
- Alpha Rocket: 6-7+p
- Level 6 = 5,000; Civilian Ships have a hull value of (+1), so any level Alpha Rocket will do that job.
- At Level 6 or higher however these can be used to deal 5,000+ damage to every ship in the blast radius, which can quickly add up in a direct assault on the enemy when combined with conventional weapons.
- Delta Rocket: 1
- Similar to above, but the big advantage of Delta Rocket is the secondary destination which can be set at any time prior to arriving at it's first Waypoint. This allows "bank shots" which can greatly distract the enemy in their backfield in particular, when used to threaten Civilian ships.
- Hydrogen Rocket: 1 (Enables MN Fire Missions)
- Rockets from a Miner that are not from a typical Support Module offer a new attack vector that many Enemy's will fail to realize have been deployed against them.
Trade/Transport Modules
- Entrust: 2+
- Level 3 = Range 372AU @ Cost 250k
- Level 7 = Radius > 1 Sector (Long Diagonal)
- Dispatch: 3+
- Level 3 = 2h10m/Relic at Target Planet, 1h5m w/ TW9
- Destiny: Level 6+
Support Modules
- Barrier: Level 4-7
- Even Barrier-1 (5h if not affected by TW) is a highly practical and desirable module, and there is a good chance it will be requisitioned for Battle. However, as the length of Barrier increases 50m at each Level, each is increasingly valuable, reaches a full 10 hours (w/o TW) at Level 7.
- Suppress: Level 5-7
- Low Level Suppress is so short it is unlikely to be requested as a part of any Load-Out. Only once it is upgraded to Level 5 (2h30m) does it really start to become an extraordinarily powerful module, shutting down a single EBBs conventional weapons for 3h10m at level 6, this jumps clear up to 4h at Level 7, 5h at Level 8 (1M Credits), and a whopping 6h20m at Level 9 (2.5M credits).
- Time Warp: 7-9
- Level 9 = 2x Speed; Level 8 = 1.9x; Level 7 = 1.8x; etc.
- Level 10 = 2.2x Speed (Up by .2x, twice the lower Levels)
- @Level 7: radius > one (1) full Sector
- In general, the higher your Teleport tech the better, however one of the things TP offers is the ability to "cancel current Waypoint", and so even Level 1 can be a priceless utility in some situations.
- EMP: 6+
- Poor ROI at just +20m per Level
- We generally prefer not to deploy EMP unless absolutely necessary, and instead develop tactics which focus on the continual reduction in the enemy's strength / capacity to attack or defend itself.
- At times though, EMP is exactly the right tool, "freezing" one or more Enemy Battleship in a situation where other BBs in our Fleet can quickly close and fire on it (w/o taking any damage at all for the duration of the EMP).
- Note: If your BB is the victim of an EMP, it is highly desirable to find some way to get a TW cover to greatly shorten the total duration.
- Teleport: Highest Level Available
Bond: Level 1-2 ⁝ Detailed Comments
- Bond is a highly sophisticated module which becomes available only with the Research of Red Star Level 8 Tetrahedrons (aka Support, Pink).
- Among the most powerful uses for Bond in a White Star, is the ability to begin a Teleport within (Bond) range of an Enemy vessel. Triggering Bond and selecting the enemy ship just prior to Teleporting to your destination, brings that enemy ship along for the ride, at exactly the same relative distance and vector it was prior to the jump. This means that a BB can "grab" an Enemy BB and bring it back to a spot (within range of it's Teleport module) where major tactical advantage can mean it's very rapid demise, for example:
- To within 120AUs of our Home Warp, where the ability to warp-out and in every 2h means the attacking BB can refresh all modules over and over again, including for e.g., Alpha Rocket, or even something like Vengeance, warping out and back immediately after it is triggered.
- {Featured in a Tactic below} =OR=, to a location nearby where we have multiple BBs standing by to fire upon the target all at once, and/or a location where we previously fired rockets timed to land just after the Teleport/Bond completes.
- An Enemy may use modules such as Teleport or Destiny to Escape an active Bond, so it is important to deploy this tactic wisely, in situations where any potential outcome will be acceptable (e.g., simply forcing the EBB to utilize it's TP module may in some cases be considered worth forcing their hand in this way).
- Among the most powerful uses for Bond in a White Star, is the ability to begin a Teleport within (Bond) range of an Enemy vessel. Triggering Bond and selecting the enemy ship just prior to Teleporting to your destination, brings that enemy ship along for the ride, at exactly the same relative distance and vector it was prior to the jump. This means that a BB can "grab" an Enemy BB and bring it back to a spot (within range of it's Teleport module) where major tactical advantage can mean it's very rapid demise, for example:
Leap: Level 1-2 ⁝ Special Comments
- Leap allows a friendly BB to rapidly (6h Level 1; 4h Level 5; etc.) jump to the closest location where at least one Ally is currently engaged active combat (conventional weapons firing).
- While this Modules can offer rapid reinforcements from literally anywhere in the system, there are a couple of caveats, including:
- Both the Leap(er) and the Leap(ee) BB will be temporarily disabled when the modules fires and so they both will be under enemy fire with no way to return fire during this time (2 hours, all Levels); =AND=
- If the Leap(ee) ship is destroyed before the jump delay has expired, the Leap will fail.
- While this Modules can offer rapid reinforcements from literally anywhere in the system, there are a couple of caveats, including:
- Stealth: 1+ (Optional, Rangers & Specialists)
- A potentially "surprising" feature of Stealth is the ability to send two ships toward an EBB with Dual Laser, only to engage Stealth on one of those BBs as combat gets underway, resulting in a Dual Laser outputting purely it's lowest, base level damage using a single beam (hitting only the non-Stealth ship.)
- Stealth quickly increases in length, 5h at Level 1 and already 8h20m at just Level 3! Accordingly, current Battle Plans will call for strictly these lowest levels of Stealth tech at this time, providing the desired tactical agility of entering and exiting Stealth mode.
Weapons Modules
- Laser: 7, and especially 8+
- @ Level 7, base damage +100 (vs. +40/level max prior)
- Reaching Laser 8, 9 and 10 is when this weapon really comes into its own, greatly outpacing B10 by a large margin, especially in an active TW scenario. (See Charts)
- Battery: 10+
- Battery 8 can be useful for equipping on our Junior Captains (RS5 or lower), but it is B10 that marks a real and definite weapon that can distinguish itself in combat relative to other weapons from a similar tech tier.
- Dual Laser: 6, and especially 8+
- @Level 6: 500 dmg/beam (Equal to Laser 7x2)
- @Level 8, base damage jumps 20 (vs. 10 prior levels)
- Mass Battery: 7+
- Level 5 hits up to 4 Targets (up from 3)
- Level 6 dmg/cannon +20 (was +10-15, Lvl 4 also +20)
- Level 7, just 2 targets = damage nearly equal to B10)
- Level 8, up to 5 targets, @2 targets = total damage > B10
- Level 9, " "; @3 targets = total damage 3780 (B10=2040)
- Omega Shield: 8-9
- Starting at Level 7, upgrade is +1500/Level (vs. 1000)
- Delta Shield: 7-9+ (Optional: Rangers Only)
- Level 7 = 30% Speed Increase; Shield > 5k (5300)
- Blast Shield: 4+
- Lower Rank Captains are best for this role.
- Blast Shield 6 = 50,000 (Cost of ¢1M)
Laser is superior to Battery in almost every situation. It does much more damage under "usual" circumstances. However, the "Achilles Heel" of Laser is to disrupt its "spin-up" process, such that the Laser must start-over at its base level damage. e.g., Suppress; Be Aware & Watchfulfor this type of environment, as Battery is going to be much more effective than usual, and can be truly deadly.
WEST: Planets & Relics
Relics Generation : Hydrogen vs Organic
- Each relic is 4 Tons
- A Level 1 planet generates 0.3 relics in 24h;
- Generates additional relics instantly for 500 Hyrdogen
- A Level 5 planet generates 0.3 relics in 24h (Same as Level 1);
- Generates additional relics instantly for 300 Hyrdogen
- A Level 10 planet generates 1.0 relic in just 24h;
- Generates additional relics for 150 Hyrdogen
- The first auto-spawn relic appears at 24 hours after the star reveal, which is 12h after the preparation period has concluded. The next is 24 hours subsequent for the remainder of the Star.
Relic LOAD
- Loading a relic onto a Transport (TT) requires 8 hrs; or 4h with TW-9
- Loading a relic using Relic Drone Level 1 is also 8 hours, but becomes significantly faster as the Tech Level increases. Level 2 takes 7 hours, Level 3 in 6 hours, Level 4 in just 5 hours, Level 5 in 4 hours, and then Level 6 in 3h20m and a slower rate of decline beyond Level 6, eg. Level 7 takes 2h 50m.
- Partial Hydrogen DROP (delivery to a Planet) works as you would expect, i.e., incrementally advancing relic creation on the Planet according to the rules above.
- A planet can store an unlimited number of relics.
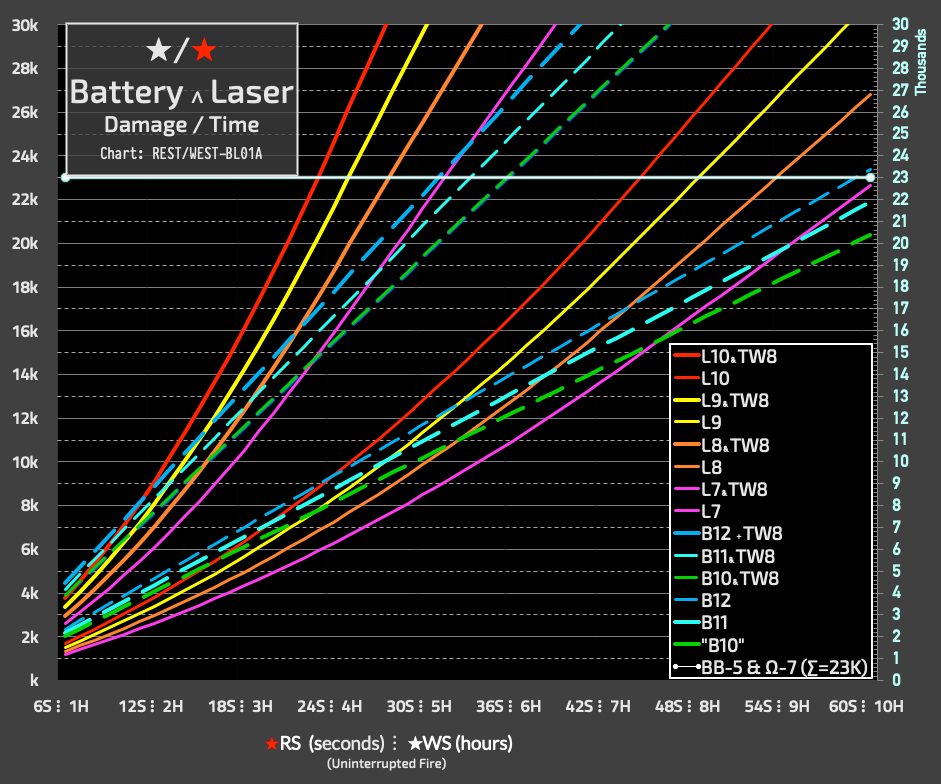
Weapon Damage
Includes Important with TW Comparison
Weapons Damage: Mid-Tier Tech

The graph above shows many different weapons and their damage output over time, but there is one clear, important fact to take from this: For purposes of White Star engagements (PvP), Lasers really begin to dominate Battery technology starting around L6-7.
Here, you can see that for an average human Battleship, a Laser 6 under Time Warp 8 (1.9x) almost beats a B10 under that same Time Warp.
The chart below this text picks up where this leaves off (L7), and includes many Laser research tiers (L7-L10) compared only with the highest level Battery (10-12).
Weapons Damage: Upper-Tier Tech
Weapons: Multi-Cannon (only): Comparison Chart

WEST: APEX Formula: Assess, Plan, Execute & Exploit
I. Assess
Each White Star will involve getting a good familiarity with what the Strategic Plan will detail high level strategy, phase-based sub-strategies and layout a clear set of tactical expectations for each Captain and Task Force within that particular White Star Fleet.
In addition to the obvious need to gain and control the military initiative, it is often also our goal to make a major impact on the enemy's capacity to mine and/or deliver Hydrogen to a planet in system.
This is very high-level on purpose. Much more detail is provided in the secret Battle Plans, which are made available to each participating Captain prior to a WS engagement.
II: Plan: Develop Strategy, Tactics & Fleet Architecture
We take great care in selecting our Weapon & Support Module profile for optimal Fleet Integration
- Optimizing the individual and collective equipment "load-outs"
- Deciding in advance on the equipment, weapons and shields for our military ships; as well as the specialized equipment and Support Modules available on our participating civilian Starcraft is highly desirable.
- Prior to each WS engagement, a set of guidelines like those on this page will be distributed to each participating WS Admiral (and at times, published to the full Team).
- All Captains: Prior to match start, each Captain must carefully ensure compliance with their specific assigned load-out configuration. If for any reason unable or if there are concerns/questions then that Captain must contact Admiral Sentar as soon as possible prior to WS go-time.
III. Engagement: Presence & Communication
![]() Use of our corporate chat services on Discord is mandatory and infers many valuable benefits to both you and the squad. You will find channel access information on the main and welcome pages of this site.
Use of our corporate chat services on Discord is mandatory and infers many valuable benefits to both you and the squad. You will find channel access information on the main and welcome pages of this site.
IV: Execute: Follow Plan; but Exploit Change
Among the several highly significant aspects of Tactical Operations, well-timed Actions (Equipment Activation) and intelligent, timely utilization of their inherent abilities is perhaps second only to the critical edge a Team gets through superior Communication, Tactical Awareness and Situational Response. Also a part of this aspect are things like "Micro Maneuvers" & "Flex Flanking".
Essential Intelligence
Minimum Engagement
Much of the essential information each Captain will need to make the best decisions throughout a match will come only through information sharing with their fellow Captains and the Admiralty. Conversely, nearly all of the unnecessary mistakes occur as a result of poor communication and/or lack of essential, timely information.
All Captain are strongly encouraged to communicate on group channels"continuously", and make timely response tohaz receiving notifications and alerts, and respond as necessary i when they are needed on their respective ECBs (Executive Command Bridge), but in any case required to perform a minimally a minimum check-in every 4-6 hours is expected.
Winning the War
A given White Star event is rarely won through straight-ahead domination and overwhelming offense. It more often a matter of superior intelligence (knowledge about the enemy), smart choices, making the fewer number of unnecessary mistakes, and adapting to change by way of excellent communication from start-to-finish, which is the exclusive means to achieve optimal coordination with other members in the Fleet, especially the Admirality.
Custom Tailored Battle Plan
Every White Star deployment includes a custom strategy developed with the benefit of system reveal and enemy reconnisance, and a database of Module Technology status for each sub-fleet. This is published in turn at a unique URL and provided to each Fleet Captain prior to start of combat.
* Such Battle Plans are drafted, discussed, refined by members of that particular White Star Fleet, then published for easy reference during the engagement with information such as enemy reconnaissance and other intelligence.
* At the end of the match, typically a video of the game (standard in-game Replay) is created, edited and annotated with important opportunities to learn and improve.
* Each White Star Battle Plan is archived prior to the start of the next.
▸ See: WEST Division:
Some procedures and tactics are provided as examples below. Many more can be found at WEST, a section of the site better dedicated to this topic and should ideally be reviewed by each Captain prior to each White Star engagement.
WEST Mining Operations
White Star Mining Operations
This section contains a general overview of White Star Mining. When preparing for a White Star battle, always reference the specific White Star Battle Plan and within it, the Mining Plan section which will include MN assignments, vectors and sectors priorities.
Miner: Standard Module Priority
- Remote Mining
- Mining Boost
- Mining Unity (Unless Crunch | Enrich spec'd)
- Crunch (Unless Enrich | Genesis spec'd)
Mining Procedures
#1: MN: Before Warping In
- Mining Plan: Review the Mining Plan for your current White Star
- Vectors/Group Assignment: Know your Miner's assigned Vectors & Mining Group
- Retrofit: Verify your Miner's Module Retrofitting Orders
#2: MN: Before Leaving Home Warp
Miner Groups: Normally a Single Formation*
See: White Star Mining Plan
Our Miners should travel together for multiple reasons as stated above
- MN travel very slowly, and are an obvious target for a typical E-Assassin, which can close very quickly. Therefore, Fleet Protocol calls for our Miners to stay in single, tight-formation, as it is easier to provide a defensive perimeter and protection.
- This frees up more Offensive Capacity which allows us to strike at the enemy in more places, and in more ways, which means we are more likely to destroy enemy Battleships.
- Each additional Miner adds a significant bonus through Mining Unity, at just Level 6 each additional MN increases the speed of a given Miner by 50%!
Typically, a number of Sectors in every White Star will be Hydrogen-Rich, and because it takes time to travel between Sectors, it is generally better to travel directly to and fully mine these ("Hydrogen-Rich sectors)", i.e., Total Hydrogen extracted is most likely to be higher over full course of the White Star.
MiningBoost⁶ = 450% Faster
Mining Unity⁴ = +40% per additional teammate mining in the same Sector -there is no upper limit to this potential bonus.
- Calculation: Three friendly players mining in a single sector and one of them equipped with MiningUnity, the math looks like this: 4.5x × 180% = 8.1x faster!**
#3: Mining: Clearing Sectors
- It only takes Crunch Level-2 to clear the standard sectors (350H) in a White Star.
Mining Module in Focus: Remote Mining
▸ Beginning at Level 5* (5º), Remote Mining pays off (more H/hour) with just two Asteroids minimum per Sector.
The rate goes from x0.49 to x0.57, and so with two Asteroids to mine, the effective "single asteroid" speed would be 98% vs. 114%. Prior to that, a Sector must have had three (3) asteroids to be worthwhile, otherwise a Miner without Remote Mining would have been faster. Beyond (2) Asteroids in the system, Remote Mining offers a solid, highly beneficial upgrade (read: do it).
For example, in the scenario where a Sector has five (5) Asteroids and is being mined with all three of: Remote Mining, MiningBoost and Mining Unity (with two Mining buddies per above example), the formula looks like this: (8.1x) + (5 x .57 or 2.85x) for a total of 10.95x faster than "base level, single asteroid speed".
Special Forces; Modules & Tactics
Special Forces may consist of one or more ships, typically with special capabilities and/or equipment, and often involving specialized shields such as Delta Shields and/or a multi-cannon weapon. These ships are then paired with specialized modules carried by a Battleship and possibly its Civilian counterpart, and together they execute a special operation or "tactic" either ad hoc or from our "play book".
Each White Star Plan will detail the specific "SWAT" to potentially be employed in that particular engagement.
Essential Modules & Concepts
Combat Support Transports
Support Module such as Suppress, Repair, Barrier or another utility that can potentially on a Transport and flown nearby to be useful to Battleships in combat. In such cases, such Transports will typically be equipped also with Dispatch, as an Emergency Hyperspace Jump utility. Usually, an acceptable, Dispatch default destination planet will be prepared or otherwise reliably anticipated prior to Transports entering the actual combat zone. (See, xPAD Task Force, ("'X' Planet for Active Dispatch").
Hydrogen Rockets
Hydrogen Rockets
Hydrogen Rocket: If any of these MNs have Hydrogen Rocket, we may leverage the module using this "housekeeping" Hydrogen from near-sectors, potentially providing us a surprise angle of attack as Phase I further develops.
Time Machine
- Time Machine is an absolutely invaluable tool that any WS player must become highly proficient in.
Time Machine ("TM") is a scenario planning tool that is accessed via the WS Icon view screen. Time Machine let's you plan one or more of your next action(s) (Max = 8 in que), which you set to execute at a specific point in time in the future.
You can plan up to 48h into the future, and queue up to 8 moves. When the first of those 8 moves has occurred, you may add one more to the end of your queue, etc.
Dangers presented by enemy vessels can threaten to wreck your plans very quickly. To help mitigate this, and to better understand where your own ship will be in game future, use the TimeMachine.
TM: Prediction Problems
TM allows you to see what "will" happen, and what "could" happen, always depending on the actions you take and those taken by others. Sometimes these future events are 100% certain to occur, but most of the time you are only able to guess what is likely to happen around your moments of decision, and plan to your best accordingly.
Meanwhile, when not using Time Machine (to enter moves), the enemy will always "see" everything you see when looking at the star map directly. Therefore, when you post your waypoints and vectors manually (or once they become triggered due to a Time Machine move you scheduled earlier) you are essentially saying "this is where I am moving to, my precise arrivals times and the route I'm going to take to get there". However, this provides an opportunity to convey "bad information" to the enemy!! (see below.
In addition to using Time Machine, we have the ability to input move orders manually, as well as do so in near real-time. By doing so, you can plot a course to a way point in one direction, but then cancel that move prior to it becoming final. More on this technique below.
Every time you provide the enemy with information is also an opportunity to provide that enemy with dis-information —you can and often should, make an effort to confuse the enemy into thinking you are going to do one thing, ideally forcing them to "commit" to some form of reaction, only to then change your orders to take advantage of the opportunity you created.
✸ Understand this About Time Machine Orders! ✸ The proper way to enter multiple legs of a planned journey from Point A to Point B is to enter your first order, then fast forward TM up until the precise moment that leg of your journey ends because you arrive at a given Waypoint. You may let a few minutes pass in order to confuse the enemy expecting you to move immediately, or trigger your next move to be entered just moments before you arrive, to allow for uninterrupted travel.
Again: If you enter multiple Waypoints into Time Machine to go off at a single point in time in the future, all of them will also show up on everyone's radar the moment they go into effect, just as if you had manually done the same thing. The difference between this and fast forwarding Time Machine in order to enter the next move just in time is ☰All Important☰.
At the same time, it is surprisingly valuable to enter multiple hops only to then cancel them later as you arrive at a given Waypoint. Send the wrong message to the enemy as often as you can, and then once in awhile send the right one to keep them guessing.
▸ ▸ ▸ Remember any Ship can change it's destination or stop altogether at each and every Waypoint. Depending on their modules, they can accelerate, even EMP themselves (occasionally handy!) or of course Teleport mid-route.
All of those possibilities can get confusing ➞ which can be said just as much for the enemy as yourself. Accordingly, your goal should be to fully understand your enemy's indicated vs. most likely movements and also use your honed skills in Time Machine to make for maximum difficult and distraction in the mind of our opponents.
Waypoint Movement Tactics
In this Section we will talk a little bit about how to "telegraph a move" you want to seem to be planning to make, in order to deceive the enemy. (These techniques can also be used to "steer" Interceptors, btw!, remember to use TM scenarios until you find the very best solution, sometimes it takes getting creative in how you approach a given maneuver).
- Each waypoint provides the Captain the option to change course, slow their arrival or coordinate with other ships still making their way to a joint destination.
- Remember, it is often valuable to utilize a waypoint that will take you slightly off course, simply due to the tremendous advantage this can provide.
**While enroute to a destination, you should commit only to the next, closest waypoint within 10º-15º of what would be your direct to destination heading.
"Telegraphing" Your Intentions
Some repeat information below, regarding how to use Time Machine and how to plot and cancel moves etc...
What is it? How, Why and When? …Questions!
Telegraph: Is a turn of phrase meant to convey the act of "deliberately disclosing future plans", such as planned movements or actions. By "telegraphing" such future plans, we can entice the enemy to make their own plans in reaction/response.
So far it sounds like we're going out of our way to give them a head start! However, the idea is to make a change to the plans you have been advertising at some point, intentionally seeking to exploit what the enemy did to initially react.
To be effective, you will generally need to enter moves manually, and often for multiple subsequent waypoints (2 or 3 is usually enough), because these will immediately show clear as day on enemy radar. It is also possible to do this same thing using Time Machine, by fast forwarding to some future point in time at which you plot a similar number of moves. **These moves will all show up on enemy radar at that scheduled moment you told Time Machine to commit to said moves.
Critically however, you must be physically attending your WS interface in order to make any later changes, because Time Machine moves will not override scheduled, manually entered moves under any circumstances**.
While it is technically possible to utilize Time Machine in this process, it is only for a limited aspect of it and requires (that you cancel any existing manual orders prior to the moment your TM is set to trigger a set of moves). I believe this is most often unnecessarily complicated and carries a heightened risk of making a mistake.
**It is also generally more effective to be "in the moment" making your false moves known to your enemy because you often will have a feel for what's going to work at a given time, and be able to effectively plan your actual moves in close coordination with other players in your immediate operational context.
Dropping in after being away for even a few hours can be disconcerting and/or cause you to miss something that has changed in the interim. Better to study carefully and then make attended decision and order entries.
Look specifically for opportunities to employ such tactic to distract or confuse the enemy, and look at multiple scenarios to make sure you discover the one that provides you the best opportunity to exploit a clever maneuver.
This is all of course usually best accomplished by careful coordination with other captains in the immediate area, or sometimes with AlphaRocket launches from Home Warp, etc. It takes a village to deceive the enemy as my grand-mammy used to say, in between chewing her cud.
Ξ NOTE Ξ Such tactics are especially effective when the specific enemy captain you are facing comes under time pressure to make a reactive tactical decision. Remain calm, watch your cancellation time-out carefully and you will often be able to take advantage of the less disciplined Captain sitting opposite yourself.
Time Warp (TW): Essential Knowledge
Many Captains do not become fully familiar with Time Warp until RS5+, and many still do not grasp certain critical aspects of the technology. Here is a summary list of the most important factors:
TimeWarp & Combat Modules
Time Warp will speed-up any and all modules you have activated within its coverage area. This means that if you allow your own TimeWarp to come within range of an enemy ship you have EMP'd, you are doing that Captain a huge favor by speeding up the baseline holding period. This can be a very significant and often overlooked loss of efficiency, reducing your EMP, Barrier and other modules to less than 2/3rds of their capacity.
- Example: An EMP with a five (5) hour Active Period will instead be active for just three (3) hours. Think of the significance that represents in terms of missed opportunity to continue doing damage to your opponent. At 1500 Damage/h you deliver 4500 instead of 7500. This is equivalent to a mid-high tier Suppress module!.
WS: Enter & Exit Rules
- "2 Hour Rule" Once a given ship has been in the WS system for at least 2 Hours, it may leave and then immediately return, or another ship warped in to replace it.
- Destroyed (or Disassembled) Ships: Return to WS in: 18H
WEST ⁝ Future Initiatives
Ideas & Issues: Discussion
Concept: Emergency Contact
A personal cell phone number is highly advantageous during a White Star. Provided to the Fleet Commander, it is used either in the event there was something that required your immediate attention in a WS, or according to parameters you specify (within reason).
Battle Log & Activity Triggers
An Alternative or perhaps complementary concept, I could maintain a special "log" of WS events and essentially maintain a "current situation report" in e.g., a Google Spreadsheet. This can be embedded within our website, or visited directly.
Using a "trigger", you could be alerted every time data changes in a certain column, and/or if a new row is added.
Confidential & Rule-Based
Understand that all of this would be setup so that your contact information is strictly confidential and known only to me, but we could make it such that anyone can add to certain areas of the Spreadsheet for example. Anything is possible. *One concept I have in mind here is this "log" would be constantly culled of any unnecessary or expired information, so, unlike the chat channels, you would only need to read what is truly worthwhile. The rest would be continually screened out.