
Speakeasy Corporation: REST
Red Stars : Strategies & Tactics
Table of Contents
Red Stars: Purpose & Objectives
Red Star: Relics (aka Artifacts)

Current Charts: Weapons & Defense Analysis
Tactical Analysis & Information Resources
Mid-Tier Weapons Comparison

Upper-Tier Weapons Comparison

Weapon Combinations: 3BB vs. 3EBBs
This assumes 3 vs. 3, where the friendly BB are facing off against 3 EBBs with 24K in shield and hull strength, each. As you can see, a combination of three Mass Battery weapons puts down the threat faster any other:

Weapon: Technology & Class
;tdlr & All: Be sure to visit the BEST Section to get some of the very best information on Weapons pertaining to Blue Stars.
- Note: Some Charts exclude Dual Lasers to reduce clutter.
- Below, find a Chart of all weapons generally in play up to and including RS6 class systems.
| Cerberus | Cerberus | Cerberus (sec.) | Cerberus (min.) | ||
|---|---|---|---|---|---|
| Weapon | Tier | Guardian Kill | Interceptor Kill | Colossus Kill | Colossus Kill |
| Battery | 5 | 39 | 45 | ||
| Battery | 6 | 34 | 39 | 229 | 3.82 |
| Battery | 7 | 28 | 32 | 192 | 3.20 |
| Battery | 8 | 25 | 28 | 169 | 2.82 |
| Battery | 9 | 22 | 25 | 153 | 2.55 |
| Battery | 10 | 20 | 23 | 206 | 3.43 |
| Laser | 4 | 36 | 40 | 198 | 3.30 |
| Laser | 5 | 33 | 37 | 176 | 2.93 |
| Laser | 6 | 31 | 34 | 160 | 2.66 |
| Laser | 7 | 28 | 31 | 144 | 2.40 |
| Dual Laser | 3 | 33 | 39 | ||
| Dual Laser | 4 | 30 | 36 | ||
| Dual Laser | 5 | 28 | 34 |
Battle Group Training: Series One
Threat of the Interceptor
The【Interceptor: Mass Battery I, 90d/s】Interceptor is relative weak offensively, only the Cerberus【Guardian: Battery I, 60d/s】is weaker. However, an Interceptor is still a serious threat on the battlefield in at least these three (3) ways:
The second you enter a Sector containing an Interceptor, you "wake it up" andand at that point it is free and able to go anywhere in the map in pursuit of your ships —and it will, often immediately.
Because the Interceptor's Mass Battery I has three Cannons, it can fire at other targets around it, even when you have it engaged in battle with one or even two of your BBs. This can mean the untimely destruction of a passing transport, or one of your Alpha Rocket's being shot down before it can inflict intended damage.
So: Engage an Interceptor 𝌆 to either kill it or lead it to your enemy 𝌆, (with any number of your BBs), otherwise if you allow it to fire on your fleet while your BB are busy with other targets, it is able to inflict up to 270d/s overall, rather than just 90d/s strictly during the time it takes to engage and destroy it. That damage can really add up, exceeding a grand total of 8K in under 30 seconds —that's equivalent to the typical Hull of a Class V BB in the time it takes one of them to destroy a Guardian.
Ramp of the Colossus
The 【Colossus: Laser IV, 110-270d/s】should be confronted in a manner that seek to limit its ability to "ramp-up" the damage done by its Laser. This can be done in numerous ways, and typically more than one method is employed when taking down a Colossus.
The cheapest of all is to fly its current target away and out of its Laser range, so that it must "reset" and start all over again, but the same thing can be done using things like Suppress and Fortress. If done properly, the Colossus should be unable to do the damage equivalent of a less than a single Sentinel, and ideally less than the equivalent of two Interceptors or three Guardians. i.e. < 180d/s on average during the engagement.
One of the biggest dangers you face when engaging a Colossus is the presence of one or more Sentinels. These must be destroyed before you begin taking down the Colossus. This important tactic is the single greatest reason we take a Dual Laser or Mass Battery into battle --so that it can be sure to have an extra Cannon (or two) available to shoot down any Sentinels even if it gets tied up with another Cerberus in the sector. That said, those weapons can be highly useful when engaging large numbers of Cerberus also, regardless of the ship type.
Combat Data Analysis
Official Weapon Charts
Star Date ▸ 19.0720+
Weapon Damage / Time
The grid below provides for quick reference for a given weapon's damage output at 3K increments, from 3,000 to 27,000. Although this table is in hours (for White Stars), if you multiply the figure times six (×6) that is the equivalent #of seconds in all other Star types.

To Zoom: Left-Click and Hold
The color bands apply "row by row", to show how quickly a given weapon reaches that tier of damage. To be clear, GREEN is the fastest (best), YELLOW is slower, and GREY is the slowest.
Because these rates of damage are identical within a Red Stars, so you can think of this chart as an overall "index" of sorts. One thing that should stand out is that Batteries are pretty hard to beat, especially as you get to B8 and especially B10. More on this below.
Tactical Scenarios: Human vs. Cerberus
Tactical Chart #001.0
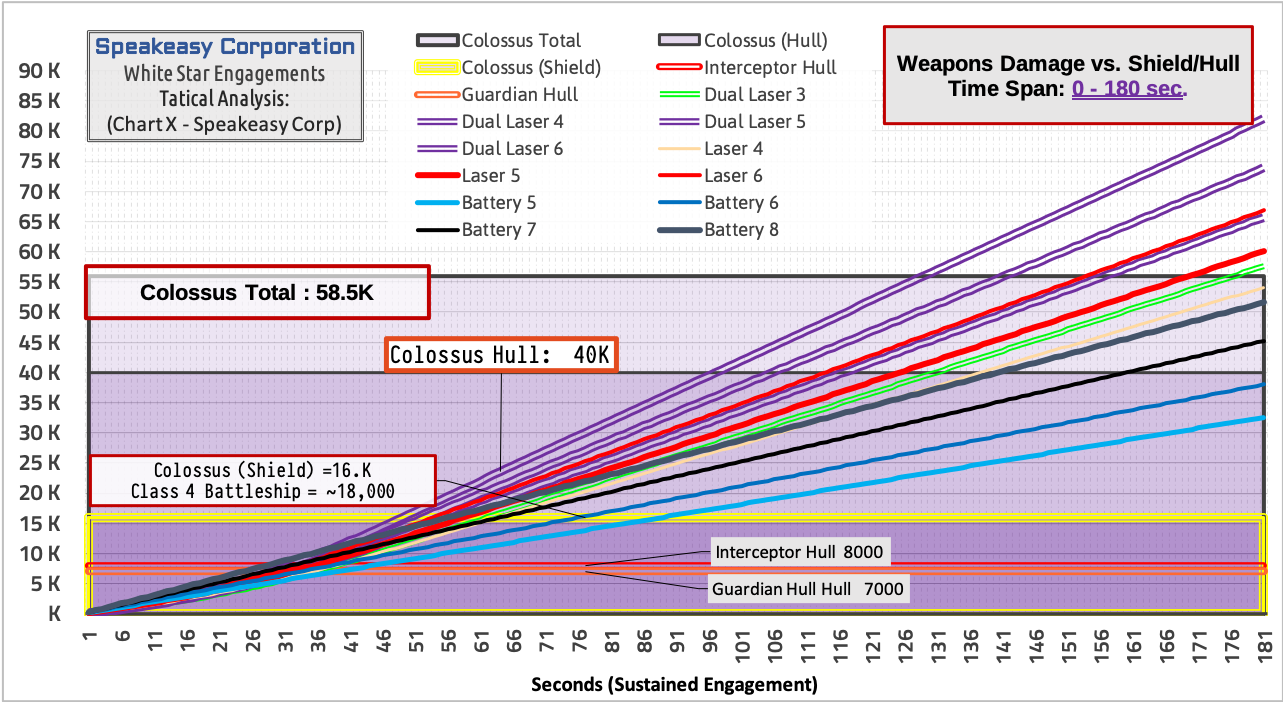
This chart shows only the Total Damage delivered by each of the various Weapons available, over time. The Chart below meanwhile, shows Damage/sec. for these same weapons. Battery a flat-line, lasers growing gradually until they peak at 30s.
Note the Colossus Shield (at 18,000 defensive points) requires the Laser 5º well over a minute if by itself. Even Laser 6º requires almost three minutes of sustained fire before defeating a Colossus. When two are applied of course, that time is cut in half. So then, we know that two BB with L6º firing in tandem kill a Colossus in 93 seconds.
Note: Although not easy to accomplish, at peak the Dual Laser 5º does 500 dmg/sec. to each of the two target ships, simultaneously. Serious firepower... when you can get it.
 "foo")]
- Similar information is available for each weapon and each enemy (Cerberus) ship type through RS5, and I've noted the typical human Battleship at around 18K (shield + hull), approximately the same as a Colossus shield.
- Remember: (Duh #14) The time it takes to destroy the enemy is time you must be able to "afford" in terms of the reciprocal damage being absorbed by your Shield/Hull defense. This can have implications during complex maneuvers and forethought must be given as variables are known to become changed.
Likewise, each second you "lose" from your shield/hull means that much less time remaining for that Battleship to continue dealing damage to the enemy near-term (prior to shield re-charge / reset).
Lastly, take special note of Battery 8+. Beginning at tier 8, this weapon is the clear winner when targets are expected to be Sentinel, Guardian or Interceptor. By that same token, B8 favorably compares to Laser 6 all the way up to ~85 seconds. There is a lot to like about the Battery weapon, especially once you hit tech level 8.
A key advantage with Battery is the static damage level regardless of interrupted engagement, where a Laser in such cases must start over, all the way back at its lowest level of damage. A lot more could be said here of course, but study the chart and learn for yourself how to optimize your Weapons.
Tactical Chart: #002.0
This chart shows Weapon Damage for those generally available up to RS5 capability. As you can see, the Dual Laser is superior in overall (total) damage, but critically, that is only true when both Lasers are able to maintain two targets for the entire time span as shown below.

In practice, the Dual Laser and and Mass Battery are important tools when attacking a Sector with more than one Cerberus ship, especially one where you could end up engaging an Interceptor or a Colossus while one or more Sentinels destroy you with their Battery Class VI!.
Tactical Chart: #003.0
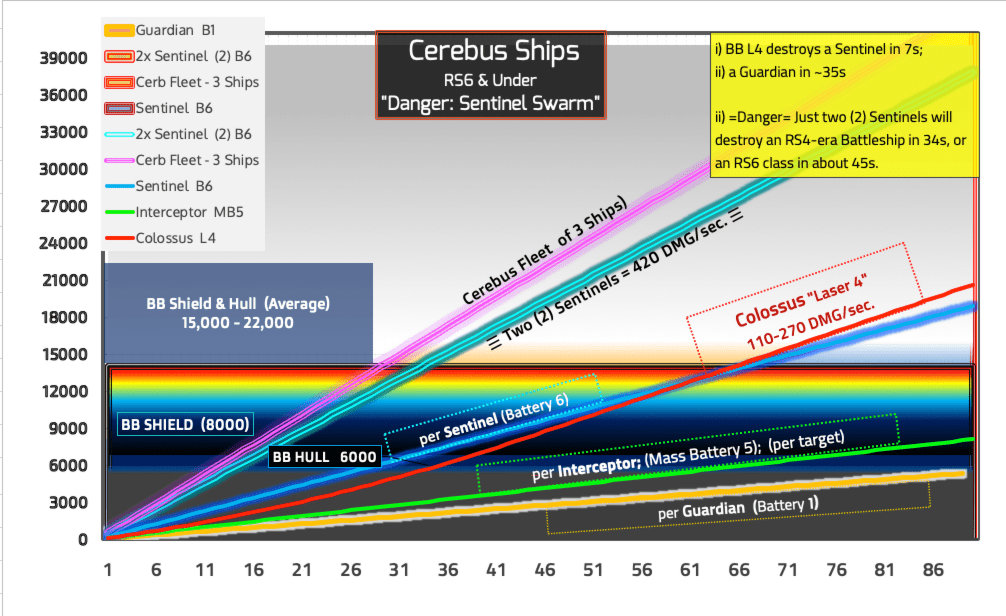
Notice at 27s Laser 4º surpasses > Battery 5º. Next, see that Laser 4º destroys a Guardian Hull (7000 Defense) at 35s, while Battery 5º needs +4sec. to do the same.
During those additional 4 seconds, the BB must soak up an extra 90d/s (360 total) from the Guardian, and take all other damage being inflicted on it by (any) other Cerberus ships it has currently engaged.

Key Message: The "threat" from Cerberus generally does not come from a Guardian or even three of them, rather it comes from the Sentinels firing on you while you try to destroy those larger Cerberus ships. Always try to destroy all nearby Sentinels before you become "locked on" to a larger Cerberus ship.
Below is a a chart which shows the same battle during the 60-90 second time span.
Tactical Chart: #004.0
This chart is almost identical to the one above (#3), except covering the time span of the next 30 seconds (60-90 seconds).

Tactical Chart: #005.0
This chart is to show how Cerberus weapons damage a typical Battleship Shield. Special notice to how quickly multiple Sentinels can destroy a Battleship altogether. Here, see important to destroy Cerberus Sentinels first!**.

This chart also depicts a small Cerberus Fleet consisting of 1 Guardian and 2 Cerberus. Notice the difference in amount of damage done between these two enemy ship types. In this scenario, the Battleship attacked the Guardian first, and is destroyed before it can even begin to attack the Sentinels.
Tactical Chart: #006.0
Here, notice the likely current technology class of your Battery weapons are generally superior to Lasers in terms of killing lower level Cerberus most quickly. Since the sooner you destroy the enemy the more hull & shield you preserve on your own ship, every point you save allows you to remain in the fight that much longer. It is especially critical to kill off Sentinels before the Guardian or Interceptor types often found in its immediate area.
*Exception: If the your current Class of Laser is the same or certainly if above* that of your Battery, the rule above largely erodes. In general you want a Battery at least two levels higher than a Laser to be competitive against it, and even three is reasonable to insist on.
While the same is roughly true for Dual Lasers, the fact that when engaging multiple Cerberus your battleship will be under heavy fire means multiple cannon weapons are often best of all. See Chart #3 above to learn more.
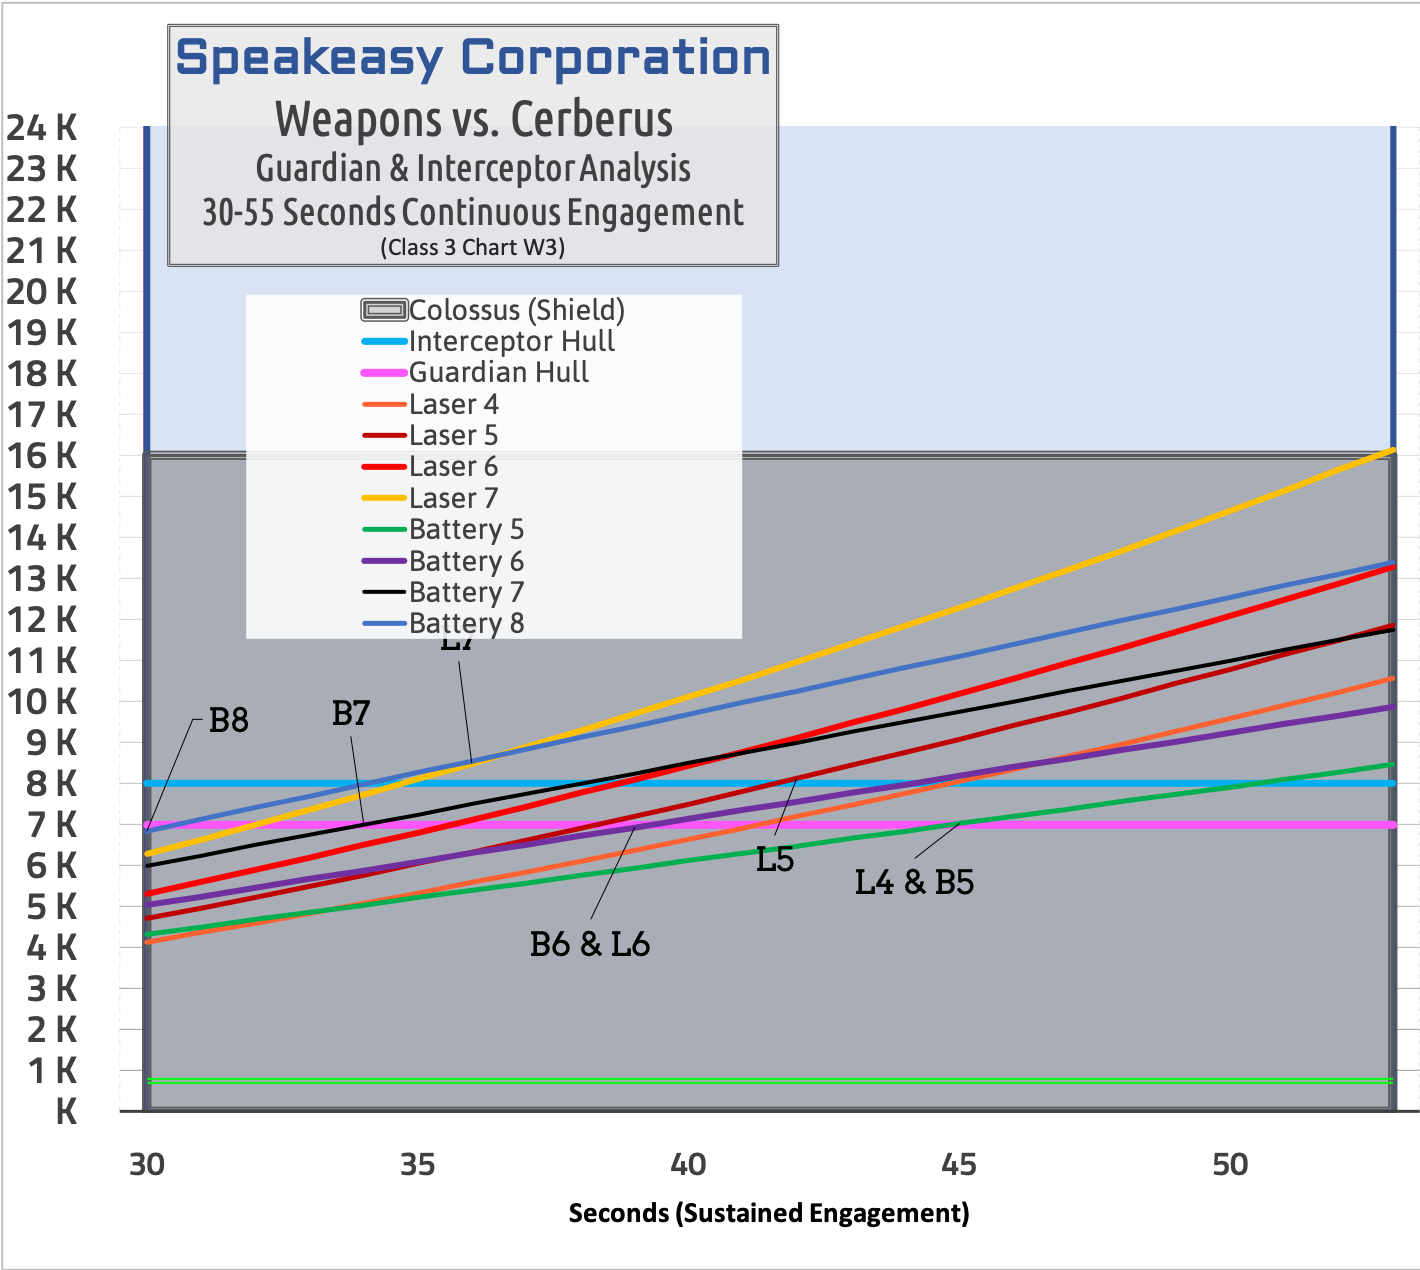
Tactical Chart: #007.0
This relatively new image shows just that critical period between 30 and 55 seconds and allows you to see in high granularity which weapons are able to destroy the respective Cerberus ships most quickly. You may want to study this one a few times until you have it memorized, at least up until RS5, at which point you'll know this and more one way or another!
*Click on any of these image to get a closer look =Zoom In=
✱Critical✱: Red Star Combat
*A repeat of the ultra important chart up above, use this for Red Star up to and including RS6, as well as WhiteStar battles in that approximate range.